Monday, September 14, 2020

Dungeon wall part 2


This is part two of the dungeon wall, things to add to the foam wall. 

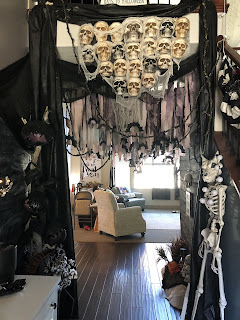
For this wall I used skulls from the dollar store, fake greenery, creepy hands, lanterns and cheesecloth, but make it yours! 

I used 36 dollar store skulls ( shout to my friend Jen @classycosmetics for this idea!) 
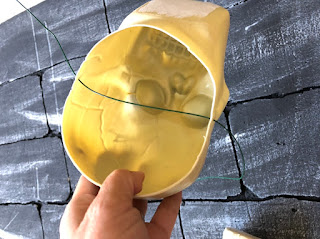
In order for them to lay flat I had to cut off the backs of their skulls. I did this by having a cutting mat to work on and then a sharp steak knife. Be VERY careful, the plastic is thin and cuts easily on the side. Make a slit and be sure to cut away from yourself. 


Next I took some sharp scissors and cut out the back of the skull, the crown is a little harder to get through 


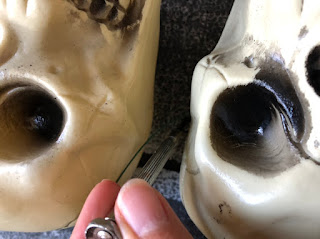
To attach the skulls to the foam I used wire. Using these tools I punctured a hole on each side of the skull that I could put the wire through 


I laid the foam wall on the floor( I used two foam brick sheets since I have a large entry way) and started figuring out where to place everything, since I would need to secure the skulls before hanging the wall. 

TIP: if you don’t want to make a stone wall, you could use a piece of black foam board from hobby lobby to create a similar look. 


To secure the skulls I used a thin screwdriver to punch holes In the foam on either side of  the skull where the wire would need to go through. After pulling the wire through the holes I would twist the wire Together to tack the skull. After all the skulls were tacked You can then stand the foam up ( better access) and tighten all the wires. I then would trim the excess wire and cover with duct tape so walls don’t get scratched up. 


To hang the stone wall I used nail and screws,( we are repainting after this)  but you can use the 3m Velcro strips as well to avoid too much wall damage.  If you want to use the creepy hands you will want to screw those in the wall. 


Once hung I started adding all the different things

I got these creepy hands from Taipan trading years ago, but found them at At Home this year. You can order them from here but they do sell out. I would get the grabbing hands to hang things like a lantern and the clawing ( pictured) for a sinister look. 


You can go to any craft store for greenery or use branches from your own tree ( willow tree branches would look fabulous!) 
The beware sign is by my friend Heidi @helloheidishop it’s larger in size then what she sells since it was one of the first she made. She sells a lot of awesome signs! 

The lanterns are on timers, and not heavy I got them from a local store, Taipan Imports. Try to find something light with a timer. 

The sconces I found at Walmart 

I added cheesecloth to the creepy hands to add a little extra creepiness. 

You could use 3m hooks as well to help things hang just the right way. 

That’s it!  I love that it is what guests will see when I open my door. 

Happy Haunting! 


Sunday, September 13, 2020

Dungeon wall part 1


I love volunteering for Make A Wish! Last year one of my kids wished to have a Jack and Sally ( nightmare before Christmas) playhouse. My partner and I wanted to replicate the fireplace in Jack Skellingtons home, but we had to keep it in budget. After some research we discovered we could get some inexpensive large sheet foam (4x8) from Home Depot and use a dremmell to create the brick. This is how it turned out 


So fun right?! For Halloween I wanted to create a dungeon/ bat cave in my entry way and decided to use the same process to create the faux brick walls. Heres is what you will need: 


1 4x8 sheet of foam 

Dremmel with guide and 1/8 inch drill bit

2 saw horses or something to brace foam 

Marker

Ruler

Black paint

Gray paint 

Vacuum


It creates a pretty big mess so I would recommend doing it in the garage or on the front lawn. 

place the foam on the saw horses, white side up then draw lines ( horizontal/ vertical) six inches apart


I use my dremmel to carve out the lines ( make sure to wear eye protection) for the bricks, here’s my dremmel set up 


Follow the lines Across and then down to create the bricks


Create notches to round out the bricks 


Then vacuum foam 


This is how it looks horizontally but remember you can do vertical too. 

Next I take a quart of  black paint and paint the whole thing black, make sure to get into all the nooks  and crannies 


Next I use a dry brush technique to highlight the bricks. 
I use a quart of gray paint, lightly dip the paint brush and then do a few brush strokes in a paper towel to get some excess off, then lightly brush with wide strokes across the bricks in different directions. I didn’t get pics of this part but here is what it looks like 


That’s it! 
In part 2 I will show you how to add fun items to create The full dungeon wall


Tuesday, September 8, 2020

Halloween coffee filter wreath


 I see these Coffee filter wreaths everywhere but in white. For Halloween I thought it would be a great change to have one in black. But how would be the best way to get the deep dark black I was looking for? Pre-dyeing all the filters with craft paint was one suggestion I came across, but the time for them to dry and the mess just wasn’t something I was up for. So I decided to experiment and see if making them first with just the coffee filter and then spraying it with black spray paint would work. It did! It’s an easy,  inexpensive craft that just takes about 3-4 hours to make. That’s two Halloween movies! Here’s what you will need:

Dollar store foam wreath 

1 pkg coffee filters ( dollar store)

Glue gun

Glue sticks

Chopstick ( or something to hold coffee filter onto foam)

Scissors

Black spray paint 

Black, orange, white ribbon 


Get comfortable! I just sat in my comfy chair and had a side table with a place to put my glue gun and hold the coffee filters and glue sticks. 

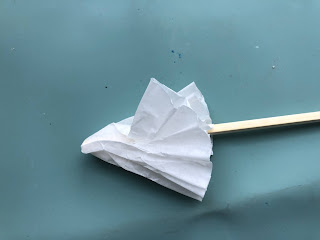
Take 1 coffee filter and twist it onto the chopstick 


Squeeze some hot glue on end 


Then place on foam wreath, if it doesn’t stay, try putting a a little in the foam wreath where you are placing it. 


Make sure to hold it there for a minute, until glue is mostly cooled

Get your next filter and repeat the steps, place filter next to first one 


Keep adding filters around the front and side of wreath, don’t do the back 


After it all filled in, you will notice some unevenness, just give it a haircut 


Next you will spray it black. I just put mine on my grass. You will be using quite a bit to get in all the nooks and cranny’s Make sure you don’t overspray, just keep going back and forth and look at it at all angles. Don’t worry about getting it to deep, just what you can see. 


I then grabbed some ribbon and attached it. I love the old time feel of it! 


I put it with some old lace curtains and some black drapery material, perfect for my haunted mansion! 


Happy Crafting! 

Sunday, November 3, 2019

Spooky ceiling tutorial


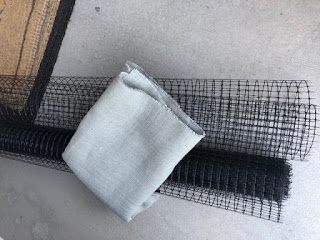
Each year for Halloween I like to do something big to fill the space in my great room. This year I knew I wanted something that would fit in with a dungeon type theme so I started thinking about a bat cave. In the past I have done haunted houses and hung string or shredded tablecloth  that people would have to walk through. I wanted something a little more than plastic tablecloths though. I have also used shredded sheets to hang on my porch, which was my friend Heidi’s idea. But I knew I needed some support to pull that look off. I made a trip to Lowe’s wondering if they might have some netting that would be cheap and help me achieve the look I wanted. I found this black Blue Hawk netting 50ft x4 ft for $24.95 it was perfect for the amount of space I needed to cover.

So here is what you will need, this is great for both inside and outside decorations

1 roll black Blue Hawk chicken netting 50ft x 4 ft
Different colored fabrics, burlap, dyed sheets, cheesecloth 
to fill 6 slots (3”x 36”strips for high ceilings) across and a strip every 8 squares in length ( it doesn’t have to be exact, you don’t want it uniformed)
Ruler
Scissors or rotary blade 
Cutting mat
Black poster board
Black string 
Bat template 
Metal hooks ( 14lb 3m hooks)
Globe or string  lights 
Large binder clips ( for outside hanging) 
Heavy string  ( I used bakers twine) 


First measure the amount of netting you will need for your space, this will help determine how much fabric you will need. I had some old sheets I had dyed years ago. Using scissors I would put a little snip across the sheet every 3 inches and then I would rip it the rest of the way. It goes a lot faster! I also used gray burlap from hobby lobby, 15 yds for this space. Different colors and fabrics enhance the look. Once you have all your strips cut the next step is to tie the netting to something secure, I used weighted chairs and my banister. 


You will then begin threading the strips, you do not need to knot them in place. I would come up through one slot and then a couple of squares over thread the strip back down. Be mindful of the edging of the netting, it is sharp and can scratch. After attaching the strips, I then took some gauze from the dollar store and weaved it through the strips, this is not necessary but I think it adds more texture and fills it in more. 

I knew I wanted bats and found a great tutorial by Martha Stewart for some large ones. I used black poster board to cut these out. I had a ton of smaller bats precut from an event so I used those as well. I  used a hole punch in the bottom of the bat, so it would be hanging upside down and then tied  some black yarn. I then tied them intermittently through out the fabric to the netting.

Covering this big of a space it was quite heavy. The original plan was to hang it across my ceiling. I had attached it to my curtain rod just to tie the strips but as I raised it up I loved  the way it sloped. I could have tied it to my banister but I wanted to be able to look down so we decided to do a first in my Halloween decorating. Put hooks into our walls! We got some metal hooks and screwed them into the studs in our ceilings, we tried to go as small as we could. In a smaller area like this one 

I was able to use 14 lb command hooks. 
After you hang it up in a smaller space you will notice you can see the edging where the netting droops because of the weight.. I took some black cheese cloth ( it’s thicker) or a strip of sheet and attached it to the hooks to cover the droop. 


I originally put the gauze on first but found it easier to do it after.
Before we raised it all up, I attached the string of lights, carefully figuring out how I would plug them in. I used the strips of fabric to knot the lights into place, then we raised it all up and anchored the netting to the hooks. The smaller space I would recommend attaching the lighting to separate 3m hooks so the lighting can act as a support to the netting. 

For the porch I have vinyl siding for my porch ceiling. I tied some cotton twine to the ends and then I attached binder clips to the siding by clipping it between the siding. You might have to force it a little. I then threaded the cotton twine through the clips to hold the netting up. I also attached lighting. 


I’m so happy with the way it all turned out! The best part is that it will be easy clean up! Just roll it all up and store it in my garage rafters! 
Happy Haunting!!!

Thursday, October 20, 2016

Super Hero Girl's Camp Theme: Music and Skits


One of the best parts of camp are the skits and music! We were so lucky to have such talented women in our stake who were able to create some amazing new words to popular songs and skits. Thanks to Sara Dewitt, Wendy Smith and Teresa Evans for their talent! 

Rachel Platt's Fight Song


The Campers who don't do anything was a skit put on by our Laurels (YCL's) it's from Veggie Tales
the Pirates who don't do anything. We thought it would be a good, humorous way to highlight the rules of camp. I would recommend recording the girls singing it before hand because it goes pretty fast and is a little hard to hear what everyone is saying.
We did this skit the camp before, it's patterned after the Airline Safety video, it's another fun way to highlight the rules of camp

Super Hero Girl's Camp Theme: Sky High and YW gift

 For the first night of Girl's Camp we always like to set the tone of camp. We have found that doing a "walk" of some kind is something the girl's really enjoy and gives a great opportunity for us to introduce the theme in a fun and spiritual way.
This year we decided to do Sky High (you know like the movie?!) We found great inspiration from Sherri Dew's book "God Needs a Powerful People" and other resources. These were the 6 classes:


Super Hero Manual (Power in the Scriptures) English Teacher
Sidekick & Villain Training (Holy Ghost Vs. Adversary) PE Teacher
Super Hero Tech (Using Technology Wisely) Tech Teacher
Protecting your Identity (Your Origin Story) Design Teacher (Edna)
Super Hero Headquarters (Sanctuary) Shop Teacher
Combat Training (Power in the Atonement) Alumni

We asked leaders up at camp as well as a member of the Stake Presidency to be the teachers of these classes. We gave them this packet that our camp directory Coralyn Grant compiled, but encouraged them to make it there own and add personal touches. Each class was 10 minutes long with 5 minutes in between to walk. In total it was about an hour and half.
This is the object lesson that I did for the Sidekick and Villains training. I think the girls really loved it! In the class we talked about Elder Bednar's talk on how the spirit communicates with us. I equated it to these lights (see packet above) and had each girl tie a tag with her name on it to her own personal light bulb. I needed to figure out a way that the girls could access the lights but also make it possible for me to raise them out of the way. Luckily my awesome husband came up to help us prep he was able to rig the lights with a rope that went the span of the stage, we then were able to put the strands like a V, the center of the strand around the rope and then the two ends tied off to a railing on the back of the stage. We then were able to lower and raise the rope by leaving enough lead rope hanging down, there was a tall piece of wood on one side of the stage with a hole near the top, we thread the rope through and then anchored it at the bottom. In contrast you could have the girls do the activity and then string the lights in between groups.
For power we used Goal Zero solar generators, the lights only lasted about two hours because of the voltage but it was enough time for the activity. It looked so amazing! It was awesome knowing that each of the lights represented one of the girls! I think it was a highlight!
At the end of the night we handed out these floating lockets, we used shrinky dinks for our insignia and then placed jewels that were the Young Women value colors inside. I ordered them from DHgate here and here we got the 4 mmnyellow and gold beads from craft stores

This was a pin that the Language Arts teacher handed out

The lights at the end of the night, our Stake Young Women's President talking about the Atonement

You could use this for Young Women's in excellence or New Beginnings as well. It might be fun for Activity days too!